
📸 Pixel to Print – Part 5: Home Printing vs. Lab Printing
There’s nothing quite like holding your own photograph in your hands — the weight of the paper, the texture, the way light bounces off the surface. It’s the moment your image becomes real.
In this post, we’re exploring one of the most exciting crossroads for any photographer: should you print at home, or send your images to a professional lab?
“A photograph doesn't feel real until it is a tangible physical object I can hold in my hand.”
— Stephen Shore, The Guardian
🖨️ Home Printing: What’s Involved?
Home printing gives you total creative control — ideal for hands-on photographers who love to tinker and refine. Here’s what you’ll need to get started:
First of all, if you have an inkjet printer at home already, then you are good to start printing photographs. Get hold of some basic photo paper and give it a go. If you want a few sheets to get you going then the club has some that you can try out in the first place, just ask and we can let you have some.
Size - One of the first decisions to make is what print sizes you intend to produce:
A4 or 8”x10” - Standard for general home use. Great for casual prints and small wall displays. Fine for competition images.
A3 or 13" x 19" (A3+): Ideal for enthusiasts or semi-pros wanting gallery-quality prints. This is the sweet spot for many serious hobbyists.
Large Format (up to 17", 24", or beyond): Some home-based pros invest in these for exhibition-quality prints, though they require significant space and cost more.
Although most club members that print, use an A3 printer, it is absolutley not a requirement even for competitions. Infact, printing full sized A3 images not only can look worse on a standard 40x50cm mount, it also means that you need a bigger file. The RPS currently even recomend printing A4 against a 40x50 mount. Personally, I usually print slightly larger than A4 - From last weeks post, you’ll recall that an A3 sheet is 297mm wide and 420mm tall - I usually aim to print arround 230mm wide and 340mm tall (13.5”x9”)- A little wastefull I know, but I prefer that kind of size as it also gives me scope to leave whitespace around the image which can look striking when used with a stroke line.
And… Spoiler Alert… Next season, we are introducing a new class open to all, for A4 unmounted prints!
Printer Manufacturers - Each brand has its strengths—Epson leads in longevity and archival quality, Canon excels in vibrant color output, and HP can be a good choice for occasional photographers on a budget. While you are free to do your own research and go with whatever make and model suits your needs, if you are looking at a printer to with a prime perpose of printing photographs, then you would do well to stick to the big 2.
Epson: Widely regarded for its pigment-based printers (e.g., SureColor P700, P900). Offers excellent color fidelity and deep blacks, especially good for fine art and monochrome.
Canon: Known for high-quality dye and pigment printers (e.g., PIXMA PRO-200, PROGRAF PRO-300). Canon printers typically deliver vivid colors and smooth gradients.
HP: Less prominent in the high-end photo printing space today but still offers competent all-in-ones for general-purpose photo printing.
Ink – There are two main types of ink used in photo printers:
Dye-Based Inks: These produce vibrant, glossy prints with excellent color gamut. However, they tend to fade more quickly over time unless printed on archival-grade paper and stored properly. Great for casual or decorative use.
Pigment-Based Inks: These offer superior longevity, water-resistance, and fade resistance, making them ideal for archival and professional-quality prints. Modern pigment printers also produce excellent color depth and black density, especially for monochrome work.
Ink Cartridge Systems vs. Refillable Tanks
Individual Ink Cartridges: Most photo printers use multiple individual cartridges (6, 8, or even 10 inks), each dedicated to a specific color. This allows for precise color reproduction and better efficiency. However, ink can be expensive.
Refillable Ink Tank Systems (e.g., Epson EcoTank): These printers allow bulk refills from bottles, offering a much lower cost per print. While early models compromised on photo quality, newer versions are capable of producing excellent photographic output, especially for enthusiasts doing high-volume printing.
Tip: Always check whether the printer uses separate black inks for photo black and matte black media. High-end printers often switch between the two depending on your paper choice.
Ink Sets - One of the defining features of a photo printer is the number of inks it uses. Unlike basic office printers that rely on just four colors (cyan, magenta, yellow, and black — CMYK), photo printers often use six or more inks to achieve smoother tonal transitions, wider color gamut, and more accurate image reproduction. But what does this mean in practice, and how many inks do you need?
Basic 4-Color (CMYK) Systems - These are typically found in entry-level all-in-one or office printers. They’re suitable for everyday printing and the occasional photo, but they fall short when it comes to reproducing fine details, subtle color transitions, or rich blacks.
Best for: Casual use, document printing, occasional 4x6” photo prints.
6-Color Printers – Today’s mid-range photo printers commonly use six inks to improve image quality beyond what basic 4-color systems can deliver. The exact configuration can vary depending on whether the printer uses dye-based or pigment-based inks or a mixture of both. As well as the standard 4 colours (CMYK) these printers often use an additional, Photo Black (which is usually pigment) and a Gray. This enhances tonal range, improves shadow detail, and provides better neutral and black & white performance — especially on matte and fine art papers.
Best for: Enthusiasts who print frequently and care about quality, but don’t need gallery-grade output.
8 to 10-Color Printers - Professional photo printers often use 8, 9, or even 10 individual inks, including specialized colors. This range of inks allows for stunning depth, color fidelity, and tonal smoothness that serious photographers demand.
Best for: Fine art photographers, professional portrait and landscape shooters, monochrome specialists, and anyone preparing prints for sale, exhibition, or archival storage.
Other Important Factors to Consider:
Print Quality (Resolution & Dot Size): Look for printers with high DPI (dots per inch), but also pay attention to real-world reviews of sharpness, color accuracy, and tonal gradation.
Monochrome Performance: Not all color printers handle black and white equally well. Look for models with dedicated gray inks for smoother gradation and less color cast.
Media Handling: Ensure the printer can handle different paper types (glossy, matte, fine art, canvas). Some offer straight-through paper paths for thick media.
Color Management Support: ICC profile support and compatibility with color-managed workflows are essential for accurate soft-proofing and consistent output.
Footprint and Usability: Some photo printers are large and heavy. Consider your workspace, ease of maintenance, screen interface, and wireless connectivity.
Paper – From glossy to fine art matte, paper choice changes the whole feel of a print.
Calibration Tools – Use a monitor calibration tool (like the SpyderX) to ensure your screen matches your prints.
Beginner Tip: Start by printing smaller sizes like 6x4” to test colors and papers without using up lots of resources.
✅ Home Printing – Pros & Cons
Pros:
Total Creative Control – Refine images exactly how you like.
Instant Results – No waiting — print anytime.
Experiment Freely – Try different papers and edits without extra cost per attempt.
Hands-On Learning – Develop a deep understanding of color and print workflows.
Cons:
High Initial Cost – Printers, ink, and paper can be expensive upfront.
Maintenance Required – Printers can clog or require upkeep.
Steeper Learning Curve – More technical skill is needed.
Requires Space – Quality printers take up room.
🏢 Lab Printing: Easy, Professional, and Consistent
If you’d rather skip the technical learning curve, printing via a lab is a brilliant option. You get reliable quality, wide paper choices, and great customer support.
Top UK Labs to Check Out:
Online Labs:
DS Colour Labs – Fast, affordable, great for everyday prints. - https://www.dscolourlabs.co.uk/
Loxley Colour – Pro-grade photographic and mounted prints. - https://www.loxleycolour.com/
Cewe - High-quality photo prints, professional paper options for both casual and serious photographers- https://www.cewe.co.uk/
Sim Lab – Budget-friendly with solid quality. - https://www.simlab.co.uk/
With most labs, you simply upload your photo, choose paper and size, and wait for the postman to deliver your masterpiece.
Supermarkets also tend to offer photo printing now. Asda in Gloucester has an in house service. Tesco Photo has an online service.
Specialist camera shops including London Camera Exchange and Clifton Cameras also offer in printing services. If there is demand, we the club can potentially negotiate favorable deals with them to enable members to print.
Pro Tip: Always check file format, color profile, and resolution guidelines before uploading!
✅ Lab Printing – Pros & Cons
Pros:
Professional Quality – Industry-level printers and papers.
Convenient – No setup, maintenance, or calibration needed.
Wider Range – Access unique paper types and finishes.
Reliable Results – Especially with experienced labs.
Cons:
Less Control – Limited ability to make last-minute tweaks.
Delivery Time – You may need to wait a few days.
Per-Print Cost – More economical for occasional printing, but adds up over time.
File Prep Required – Ensure you’ve got color profiles and resolution right.
🧾 Matching Paper Types to Image Styles
Choosing the right paper adds personality to your photo. We will be talking much more about papers in an upcoming post, but here’s a quick guide:
Glossy – Shiny, bold, ideal for colorful landscapes or street scenes.
Luster/Satin – Subtle texture, excellent for portraits and general use.
Matte – Non-reflective and soft, ideal for black & white or moody edits.
Fine Art Textured – Painterly feel, great for artistic or abstract images.
Try This: Order a sample pack from your lab to see and feel paper types firsthand.
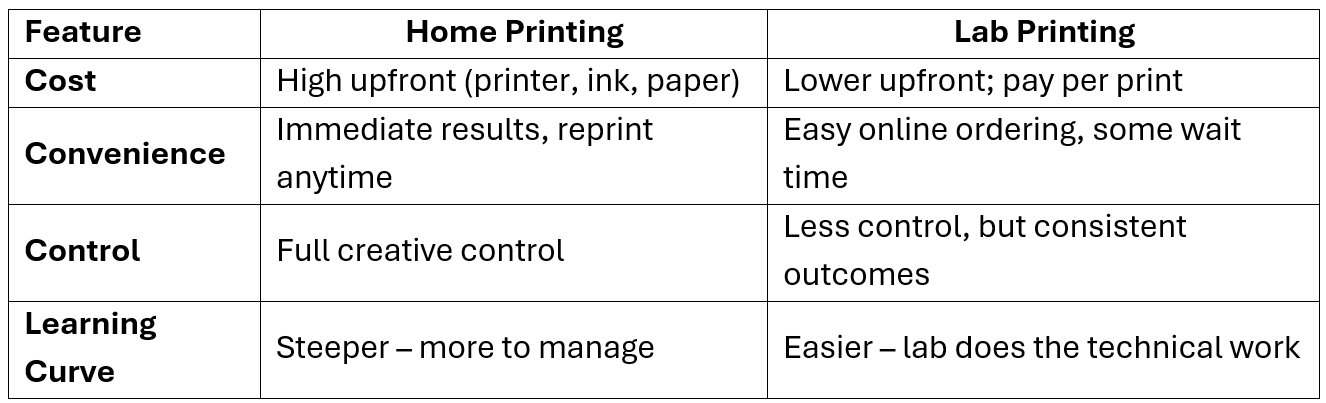
🤔 Home vs. Lab: Which One is Right for You?
👯 No Printer? Buddy Up!
We’re continuing our Print Buddy system in the club! Don’t have a printer yet? Pair up with a fellow member who does. You’ll get hands-on experience, learn the ropes, and print your images together.
Ask a committee member if you'd like to be matched up!
Bottom Line:
Love to experiment and learn? Go with home printing.
Prefer simplicity and polish? Lab printing might be your best bet.
🛠️ Action Step:
Do a little research to explore your print options. Look up 2–3 labs (local or online) and compare:
Print sizes and formats
Paper types
Prices for standard sizes (e.g. 6x4", 8x10", A4, A3)
Turnaround time and shipping
Optional: Order a small test print to assess paper and print quality firsthand.
🔜 Coming Next: “The One You’ve All Been Waiting For – Paper Types”“Editing for Print: Getting Your Images Ready”
We’ll take a deep dive into the world of paper — exploring how different textures, finishes, and weights can completely transform the mood and impact of your photographs. If you've ever wondered whether your image would sing on a satin, matte, or fine art surface, this is the post you won't want to miss.
Stay tuned for one of the most important steps in the Pixel to Print journey